


“Wolves of the Sky” by Frederick Blakeslee
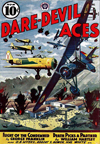
We’re back with another of Frederick Blakeslee’s “The Story Behind The Cover”—this week the spotlight’s on the July 1933 cover of Dare-Devil Aces. Blakeslee presents the story of an attack on a flight of German planes that was the result of a toothache! Without further ado, Blakeslee’s “The Yellow Hornet”…
 TWO ALBATROSSES had become the special terror of Allied two-seaters. Known as the “Wolves of The Sky,” unlike wolves they were not cowardly. They fought viciously but fairly. They seemed to love a fight against odds. Although they did not hesitate to attack a two-seater that was weakly protected, they seemed to take special interest in those which had strong escorts.
One day however, they met their match in a numerically weak combination—a two-seater Bristol and a single Nieuport. The former was flown by an English crew, the latter by a Frenchman. The Germans sighted this pair over Boche lines, and went to the attack. The Nieuport was flying a little above and behind the Bristol, and kept this position apparently unaware of the enemy’s approach, until the Germans had approached within range. Then suddenly both Allied ships turned and charged at the startled Boches, guns blazing. The Germans swerved aside only to find that each one had an enemy on his tail. Then two separate combats developed.
The German who found himself in combat with the heavier and slower Bristol could not, despite his superior speed, get that ship in his sights. Finally in desperation, he looped, dove and came up under—where the Bristol should have been. But the British plane had executed a sudden skid, dove and passed the Alba-tros as it shot up. The British gunner’s deadly aim did the rest. With a wrecked motor the Albatros stalled, then dropped away out of sight.
In its first dive on the other German, the Nieuport had so badly damaged the tail assembly of the Albatros that it, too, was compelled to dive away, unable to turn either to right or to left.
Thus began a series of fights between these four ships, extending over a period of five or six weeks. Neither gained a victory—then, just before Armistice Day. the luck broke for both sides.
The two Germans, by using a cloud formation, surprised the Frenchman. In one burst the propeller of the Nieuport was shattered and the fabric on the tip of one wing was chewed to ribbons by flaming slugs. The Frenchman turned and dove, with the Germans strung out behind. There was purpose in that dive, for the Nieuport passed under the Bristol who met the Germans with a blistering broadside. The leading Boche joined the Frenchman in his glide to earth.
The battle between the remaining Albatros and the Bristol was short but savage. Suddenly the German was seen trying to correct a jam in his guns; he was forced to stop firing. Almost at the same time the Englishman discovered that he had used his last drum of ammo.
He looked toward the German who threw up his hands to indicate he was through; the Englishman did the same. They waved to each other and both went home, with their planes in bad shape.

“Wolves of the Sky: The Story Behind The Cover” by Frederick M. Blakeslee (August 1933)
Check back again. We will be presenting more of Blakeslee’s Stories behind his cover illustrations.